Problem History#
I work at a school district in the US (Kansas City area). After the school year ended, my Director decided he wanted to upgrade to vSphere6 from vSphere55U2 on a few Hosts we were using with XenApp. We are using XenApp to deliver apps to student labs that utilize an Autocad program. As such, our Hosts also have a graphics card in them – nVIDIA GRID K1. To give the students a bit more graphics power this upcoming school year, we added a 2nd nVIDIA card to each Host. The Hosts are HP Proliant DL380p Gen8 with Intel Xeon X5650 2.67GHz processors and about 296GB RAM. Since we added a 2nd nVIDIA card, we also needed to upgrade the Host power supplies to support the 2 cards’ power consumption (1200W support).
In addition, we only had one 2-port Fiber Adapter in each Host. We wanted to add another for redundancy. The Adapter model used is HP FlexFabric10Gb 2-port 554FLR-SFP Adapter. Upon booting the Host after adding both the 2nd Adapter and the 2nd nVIDIA card, I experienced two issues:
Before the POST, a RSOD (red screen of death) displayed stating: NMI Detected. Consult Integrated Management log for details
and then after I resolved that error, and attempted the vSphere6 install, I received the following:
When I reviewed the iLO log for the RSOD NMI error, I saw the following recurring messages:

I thought it would be worthwhile to share this with the community since 1. I found little to no posts on either issue in my resolution research, and 2. if anyone is using graphic cards to deliver visually-enhanced desktops as we are, this may prove beneficial and expedite any Host troubleshooting due to adding the aforementioned hardware.
Resolution#
NMI Error
The 1st issue wasn’t too entirely difficult to figure out the cause, but was a bit cumbersome to figure out the resolution. The issue was caused by adding the 2nd Adapter in the 2nd riser card that also housed the 2nd nVIDIA card, as noted in the iLO log image shown above. To mitigate the NMI error, a BIOS setting needed changed:
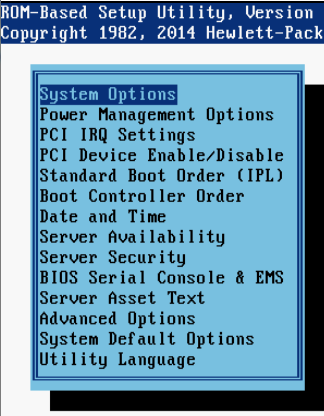
Enter the Setup Utility by pressing F9 during POST.[

Arrow down to the 2nd option – Power Management Options, then press ENTER.
Arrow down to Advanced Power Management Options, then press ENTER.

Arrow down to Maximum PCI Express Speed and press ENTER to change the setting to:

Press ESC out of the Advanced Power Management Options window, ESC out of the Power Management Options winodw, then ESC again to exit out of the Setup Utility. When prompted, press F10 to Save and Exit the Utility and reboot the Host.
Decompressed MD5:
After I resolved the NMI error, I attempted to install vSphere6. After the Host detected the vSphere package, I selected to install it and it began to unpack it. Towards the end of the unpack phase, the Decompressed MD5 error displayed. To resolve this error, I did the following:
I upgraded my BIOS to the latest version. As of the date of this post (12 Aug 15), the BIOS firmware latest release is dated 2 Aug 2014 (A), meaning it was ‘amended’ (13 Oct 2014); see this link: http://h20564.www2.hpe.com/hpsc/swd/public/detail?dwf.restartSession=true&sp4ts.oid=5194969&swItemId=MTX_e8d0275c17494b81b03e42bb3d&swEnvOid=4166#tab5
Press F9 to get into the main Setup Utility window (see Setup Utility image posted above).
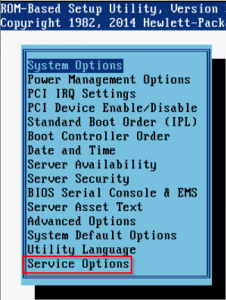
At the main Setup Utility window, press CTL+A, which will then add Service Options at the end of the list.

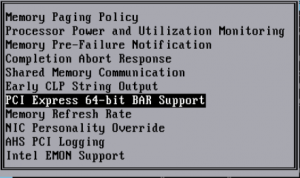
Arrow down to Service Options and press ENTER; when in Service Options, arrow down to PCI Express 64-bit BAR Support.

If this option is not set to Enabled, Press ENTER and set it to ENABLED.

Press ESC out of the Service Options window, then ESC again to exit out of the Setup Utility. When prompted, press F10 to Save and Exit the Utility.
After the Host reboots, re-attempt to Install ESXi. The Decompressed MD5 error should not display any longer.
