I recently bought a Google Nest Hub 2nd gen and wanted to use it as a dashboard device for Home Assistant (HA). Now, the Google Nest Hub is not really meant used like this, as there is no real way of installing 3rd party apps on it, such as the Home Assistant app.
Thankfully there are ways to get it to display Lovelace Dashboards from HA, one of them is by using the built in Home Assistant Cast capability, but that has some requirements that I didn’t like, namely that you need to either have your Home Assistant instance available from the internet, with proper certificates over HTTPS, or you need a Nabu Casa subscription (which in turn gives you the required encrypted access). I do not want my Home Assistant instance to be available at all from outside of my local network, if I need access to it when I’m not at home, I use other connection methods to get access to my local home network.
The option I went for, was utilizing Cast All The Things (catt). Simply put, catt enables casting to compatible devices of both local and remote URLs, and it even works with http traffic locally.
Installing Cast All The Things#
I opted, after trying different things, to go for running catt in an Ubuntu instance I already had running in my Home Lab.
Installing catt prerequisites (can be skipped if these are already in place)#
sudo apt install python3-pip python3-setuptools
Installing catt#
pip3 install --user catt
Once catt is installed, it enables a lot of options:
Usage: catt [OPTIONS] COMMAND [ARGS]...

Options:
  -d, --device NAME_OR_IP  Select Chromecast device.
  --version                Show the version and exit.
  -h, --help               Show this message and exit.

Commands:
  add           Add a video to the queue (YouTube only).
  cast          Send a video to a Chromecast for playing.
  cast_site     Cast any website to a Chromecast.
  clear         Clear the queue (YouTube only).
  del_alias     Delete the alias name of the selected device.
  del_default   Delete the default device.
  ffwd          Fastforward a video by TIME duration.
  info          Show complete information about the currently-playing video.
  pause         Pause a video.
  play          Resume a video after it has been paused.
  play_toggle   Toggle between playing and paused state.
  remove        Remove a video from the queue (YouTube only).
  restore       Return Chromecast to saved state.
  rewind        Rewind a video by TIME duration.
  save          Save the current state of the Chromecast for later use.
  scan          Scan the local network and show all Chromecasts and their IPs.
  seek          Seek the video to TIME position.
  set_alias     Set an alias name for the selected device (case-insensitive).
  set_default   Set the selected device as default.
  skip          Skip to end of content.
  status        Show some information about the currently-playing video.
  stop          Stop playing.
  volume        Set the volume to LVL [0-100].
  volumedown    Turn down volume by a DELTA increment.
  volumeup      Turn up volume by a DELTA increment.
  write_config  DEPRECATED: Please use "set_default".
Preparing Home Assistant#
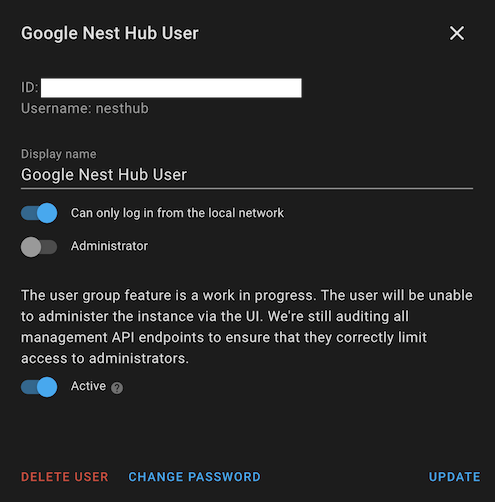
Creating a dedicated User#
Next, I created a dedicated user for the Google Nest Hub in HA, without administrator access.
Allowing bypass login#
Since there is no keyboard on the Nest Hub, typing in a password for an user account is problematic. In order to bypass that, some changes needs to be done to the Home Assistant configuration.yaml file:
Under homeassistant: I added the following:
  auth_providers:
    - type: trusted_networks
      allow_bypass_login: True
      trusted_networks:
        - <Google Nest Hub IP Address>
    - type: homeassistant
Basically this allows the Nest Hub to log into HA, without providing a password, given that it comes from the <Google Nest Hub IP Address>. When the Nest Hub opens HA for the first time, you select one of the available user accounts from a list, and select to remeber that user for subsequent logins. It then logs the device in, without asking for a password. I could also have used the trusted_users option, but I haven’t explored how that works yet. For details on how this works, check the Home Assistant Authentication Providers documentation.
Creating Nest Hub specific Lovelace Dashboards#
Next up, was creating some Nest Hub specific dashboards. I created new Lovelace Dashboards specifically for this, since my normal browser based ones are way to crowded to show on a small touch based device. In the end, I ended up with a new touch optimized dasboard, named Touch, with three views; Main, Lighting, Playing. Switching between them, is as easy as touching the icon for each of the views on the top row.
In order to get a coherent and touch friendly dashboard, these rely heavily on nested Grid Cards. The yaml files for these are available here:
Main View#
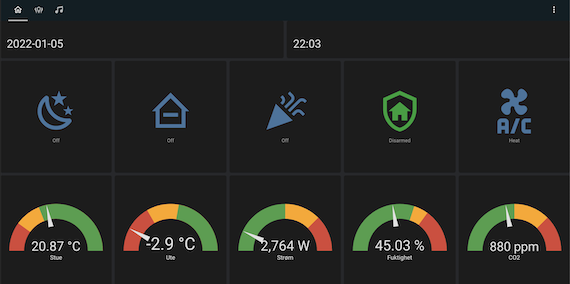
This view contains a top row that shows time and date, a second row that has some buttons; Night Mode, Away Mode, Party Mode, Alarm Status and AC Control. The mode buttons I use for other automations in Node-RED.
When Night Mode is enabled a bunch of light are all turned off (while others stay on), Away Mode ensures that some things are not automatically happening when we are away, and Party Mode overrides automations that turns off other entities on predefined times and a few other things. Alarm Status basically justs shows if the alarm system is enabled or not (and lets us turn it on/off from the panel), and the AC Control button allows for setting the thermostat, heating/cooling mode, etc as well as show the current status.
The second row is a bunch of gauges, that show indoor temperature, outdoor temperature, current power usage, indoor humidity and the current indoor CO2 measurements.
Lighting View#
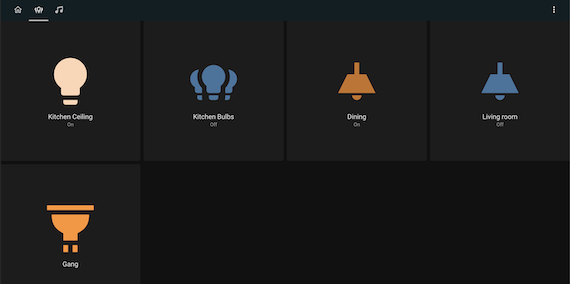
This View is pretty self explanatory, it controls lights. I’ve only included a subset of the lights here, as these are the ones on the floor where the Nest Hub is located.
Playing View#
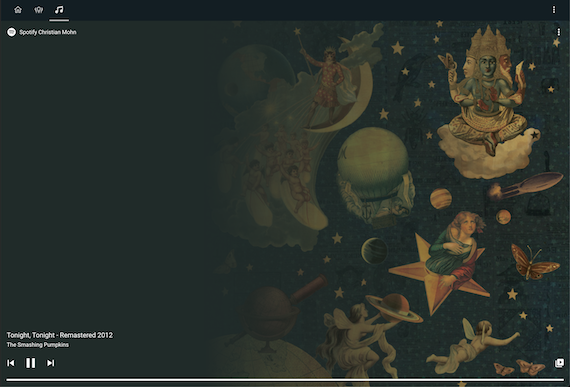
This view just shows a standard Home Assistant Media Player connected to my Spotify account. This view is mainly used in the Node-RED Automations.
catt scripts#
As mentioned, I use catt to cast these Lovelace Dashboards to the Nest Hub, and doing so is pretty simple:
catt -d <Google Nest Hub IP Address> cast_site http://<Internal HA IP/DNS Name>:8123/lovelace-touch/0
This casts my Main View to the Nest Hub, and after the initial login this works very nicely indeed.
However, after 10 minutes, the Nest Hub goes into sleep mode, and stops the cast. It does not seem like the Nest Hub detects that the gauges change frequently, or that the clock updates. In order to bypass that, I decided to use Node-RED in HA to start casting every 9 minutes. Now, this is somewhat annoying as it forces a re-cast to the device, which redraws the display entirely, but I haven’t found a way to work around that in any other way. If someone knows how to disable sleep mode on a Nest Hub 2nd Gen, please let me know!
At the time of writing, the Nest Gub 2nd Gen was running Firmware version 276689, Cast firmware version 1.56.27669, with catt v0.12.5. I have seen others that has had problems with the display timing out or sleeping after 30 seconds, but I have not seen that on my device.
I have created two simple bash scripts on the VM that catt runs on:
catt-dash0.sh
#!/bin/bash

# Grab existing volume value (This is hacky, since the output fom status only shows the value for volume if there is no video playing)
nestvolume=$(/home/<username>/.local/bin/catt -d <Google Nest Hub IP Address> status)
nestvolume=${nestvolume:8}

# Cast specific lovelace dashboard from HA
/home/<username>/.local/bin/catt -d <Google Nest Hub IP Address> stop
/home/<username>/.local/bin/catt -d <Google Nest Hub IP Address> volume 0
/home/<username>/.local/bin/catt -d <Google Nest Hub IP Address> cast_site http://<Internal HA IP/DNS Name>:8123/lovelace-touch/0
/home/<username>/.local/bin/catt -d <Google Nest Hub IP Address> volume $nestvolume
catt-dash-spotify.sh
#!/bin/bash

# Grab existing volume value (This is hacky, since the output fom status only shows the value for volume if there is no video playing)
nestvolume=$(/home/<username>/.local/bin/catt -d 192.168.5.132 status)
nestvolume=${nestvolume:8}

# Cast specific lovelace dashboard from HA

/home/<username>/.local/bin/catt -d <Google Nest Hub IP Address> stop
/home/<username>/.local/bin/catt -d <Google Nest Hub IP Address> volume 0
/home/<username>/.local/bin/catt -d <Google Nest Hub IP Address> cast_site http://<Internal HA IP/DNS Name>:8123/lovelace-touch/playing
/home/<username>/.local/bin/catt -d <Google Nest Hub IP Address> volume $nestvolume
Both scripts first stops any existing casts, and checks the existing volume setting from the Nest Hub, and stores that value in the nestvolume variable, and then sets the volume to 0, which is the same as mute. This is done because if the volume is on, the Nest Hub plays a sound when you start casting to it. Since I restart the casting every 9 minutes due to the sleep problem mentioned above, this gets annoying very quickly.
They then proceed to start a new cast, of a specific dahboard/view, before setting the volume back to whatever value it was set to before the script ran.
These two scripts are the basic ones I use for now, and I call these via Node-Red.
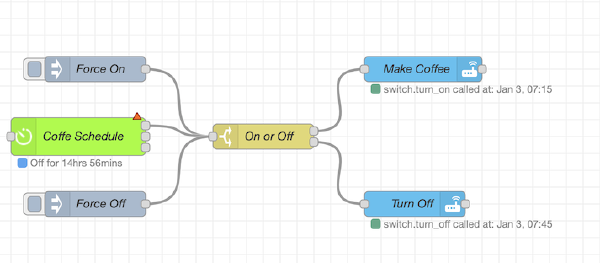
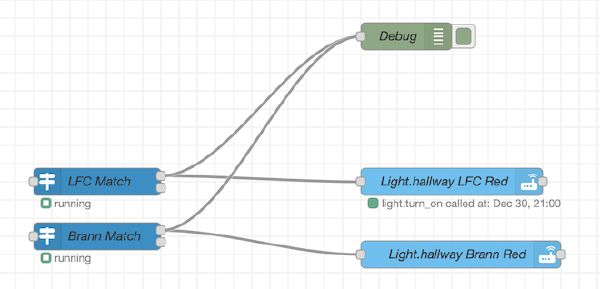
Node-RED Automation#
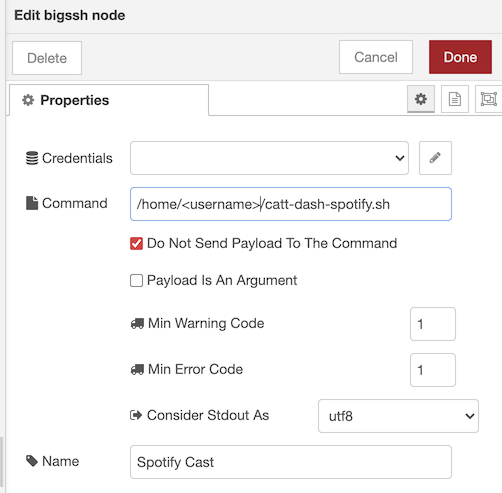
To overcome the problem with the Nest Hub sleeping, I have created a Node-RED flow that starts casting every 9 minutes. In addition I’m checking if something is playing on a Volumio with HiFiBerry instance I have running, if that’s the case, cast the Playing View, if not, show the default Main View. This is done with the node-red-contrib-bigssh node, that allows Node-RED to connect to a remote machine via SSH, and run commands:
The entire flow looks like this:
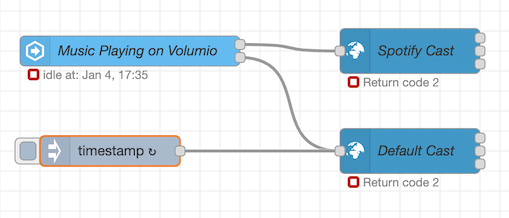
The Spotify Cast node calls the catt-dash-spotify.sh script, and the Default Cast node calls catt-dash0.sh. The Timestamp node just repeats every 9 minutes, to ensure casting.
All in all, it looks like this when all of it works together:
And this, auto switching Lovelace Dasboards based on events in HA, via Node-RED. https://t.co/6jin0hsNnN pic.twitter.com/ygihyqxwyB
— Christian Mohn™ (@h0bbel) January 3, 2022
Over time I’m sure I’ll work out other methods and use cases for this, but for now this works very well. It’s nice to have a small, stylish, fully touch enabled display where the most commonly used buttons are easily available.
This is a bit of a hack, with quite a few moving parts, and in the long run I think most people will be happier with running this on a cheap-ish Android tablet, with the native Home Assistant App on it, instead of casting Lovelace Dashboards to a Google Nest Hub.