Heard of Caddy? If not, here’s a quick intro on how I currently use it. Note that I am barely toucing the surface of what it can do, but after I have a couple of simple, yet very handy use cases for it.
First off, what is Caddy 2?
Caddy 2 is a powerful, enterprise-ready, open source web server with automatic HTTPS written in Go.
Simply put, it’s a web server with, amongst other things, automatic TLS certificate support, and reverse proxy functionality.
The official docs does a good job of explaining how to install it, on various operating systems, so head over there to get installation details.
Use Case 1: Reverse Proxy with TLS support#
My first use case, was to utilize Caddy 2 to provide reverse proxy functionality. I wanted to give plausible.io a go, and running it in a container seemed like a good route. I spun up an Ubuntu VM in my DMZ sone, whis is based on my existing Guide: Creating Isolated Networks with Ubiquiti UniFi configuration.
Step 1: Install self-hosted plausible.io#
I followed the plausible.io self-hosting installation guide , and the install was painless and worked right out of the box. By default, plausible.io is available on port 8000 after install.
Step 2: Create public DNS records for plausible.io hostname#
I host DNS for my domains on Cloudflare, so I created a new A record for a host in one of of my domains, pointing to the public IP of the Ubuntu VM in my DMZ.
Step 3: Port Forward port 80/443 to the DMZ IP#
Since my DMZ is running private IPs (and I do not have a block of public IPs) I configured my Unifi Firewall to port forward port 80 and 443 to the Ubuntu VM.
Step 4: Configure Caddy 2#
Finally, we get to the Caddy 2 setup. I created a Caddyfile, with the following config:
newhost_name {
    reverse_proxy 127.0.0.1:8000
}
Obviously, replace new_host_name with your actual hostname from Step 2. All this config does, is to tell Caddy to redirect inbound connections on port 80/443 to port 8000 on your localhost, which in this case is the plausible.io container.
Once the Caddyfile is in place, start Caddy 2 with caddy start. That’s where the magic happens, when Caddy detects a public DNS name in it’s config, it checks the hostname defined in your Caddyfile with the DNS records, and if it’s valid, it’ll automatically go out to Let’s Encrypt and request certificates for the domain (if it’s localhost or 127.0.0.1 it will create self-signed certificates).
For details on the process, see Automatic HTTPS. This removes all the pain of automating this yourself, or fiddling around with certificates. All you need is a public hostname, and off you go, certificates and all!
Once this was done, any requests to the hostname defined in the Caddyfile on either port 80 or 443, all get silently redirected to port 8000 which happens to be the plausible.io container. Obviosly, you can run several containers in the same VM (or other methods, I plan on moving all of this to VMware Tanzu at a later time).
Adding access to a new container, via port 80/443, is as simple as copying the host declaration in the Caddyfile, and changing the hostname, and then restarting Caddy 2.
Use Case 2: Simple HTTPS Static File Server#
I suddenly also had the need to offer a set of files via a web server, also via HTTPS. For details on this, have a look at this Twitter thread, but the short of it was that newer VMware vCenter updates require HTTPS even if updating from a custom URL. Since I had recently played around with Caddy, I figured this should be something that it could also do. Turns out, it does.
Step 1: Create new hostname in DNS#
I added a new hostname to my DNS provider, like I did in Use Case 1 above.
Step 2: Add new section to Caddyfile#
Since I already had a Caddyfile defined, I added the following section to it:
new_host_name  {

root * /static/
file_server browse
}
All this does, is to serve the files in /static/, with file listings. No other setup required in my case, as I just wanted the vCenter update bundle available via HTTPS. Since I already had the required port openings (port 80/443) from my first use case, I didn’t have to do anything else to my network or firewall setup.
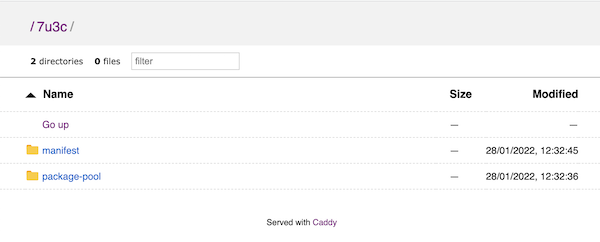
Serving the files#
I extracted the .zip file I downloaded from VMware, and copied the files to /static/7u3c/. Once that was done, I restarted Caddy 2 with the caddy stop and caddy start commands and my static files were available, with a valid TLS certificate.
Closing Comments#
Obviously, you’ll want to run Caddy 2 as a service if using this in production, and the official documentation has you covered there as well.
As mentioned, I am barely utlizing any of the features that Caddy has to offer, for instance you can also use it to redirect traffic to different hosts in your DMZ or network, but for now it has covered two specific use cases for me, in a very simple manner — and I really, really, really like the automatic certificate handling that it offers!