Some History#
I also had a small Synology DS216play and a very old HP MicroServer N36L that I ran FreeNAS on.
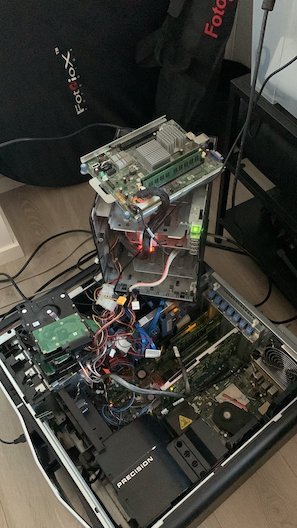
A few months back, the MicroServer decided to call it quits after many, many years of service (it was released in May 2010!). To replace it I got ordered a new Synology DS920+ with 4 x Seagate IronWolf 4TB 3.5" NAS HDD’s. In order to get my data rescued from my old MicroServer/FreeNAS setup, I had to gut the old Precison T7500 and move the disk controller over to it, and then install FreeNAS in order to import the ZFS pool. In fact, I kept the drives in the MicroServer chassis, and just moved the disk controller over to the T7500, and booted it up with FreeNAS. Thankfully I got all 3TB worth of data copied out of the ZFS Pool and onto the new Synology NAS.
After that it was just a case of booting up ESXi again on the T7500 and I was back in action. This did however highlight that the home lab environment was in dire need of a complete overhaul.
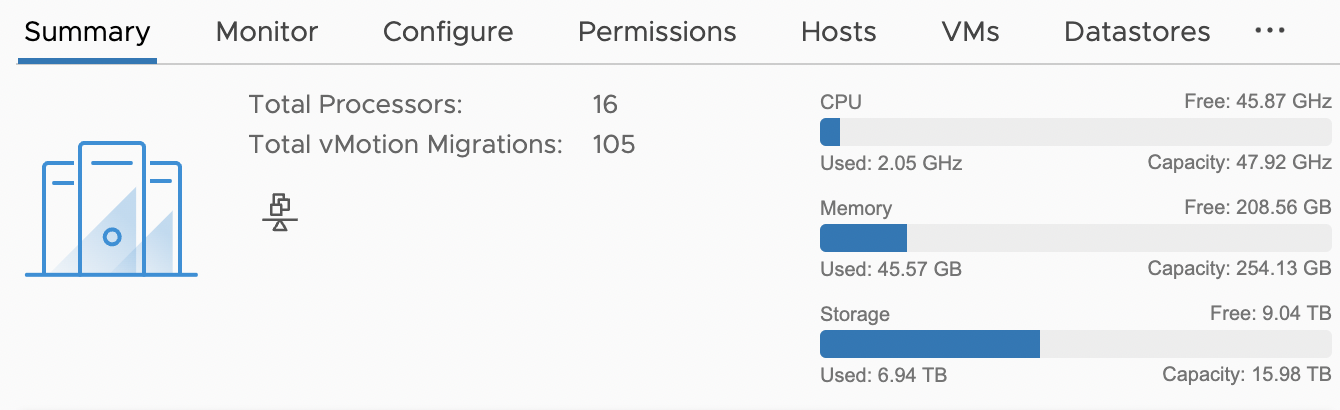
A single ESXi host, with obsolete CPU’s, 24 GB of ram and some local disks just wasn’t cutting it anymore. I couldn’t even run a VMware vCenter properly without saturating the entire host, and there was no room for playing around with anything new. And, let’s face it, a home lab that runs Home Assistant, Plex, Pi-Hole and various other services, is in reality a production environment!
Thankfully my employer Proact has a proper local work lab, so most things I need for work I can test out and play with there, but I still have need to do some ad-hoc testing and nothing beats the possibility of spinning up new things quickly in a local environment.
So, I started on a quest looking to revamp the home lab, exploring different hardware options and looking at availability of said components.
New Hosts — A Surprising Form Factor#
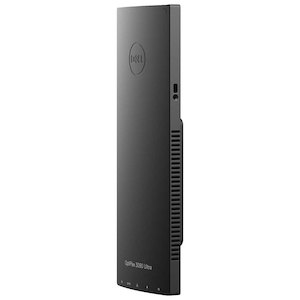
My new hosts are 4 x Dell OptiPlex 7090 UFF. Yes, the ones designed to mountable inside the monitor stand of some Dell monitors. They are small and quiet, which is kind of the holy grail when it comes home labs. Most home labs these days are based on Intel NUCs, but due to the current supply chain issues NUCs where close to impossible to get hold of when I needed new hosts.
The OptiPlex 7090’s fit the bill, as they are capable of supporting 64 GB RAM, and can be equipped with i7-1185G7 (Tiger Lake) CPUs. This, combined with M.2 NVMe devices internally is definitively quite a few steps up from my old Precision T7500 with actual HDDs aka spinning rust.
These hosts will be running VMware ESXi, naturally, and in order to get the internal Intel Corporation Ethernet Connection (13) I219-LM NIC working, I needed the Community Networking Driver for ESXi Fling in my ESXi image. Since I also have external USB based 2.5 GbE NICs, the USB Network Native Driver for ESXi Fling was also required.
Each host also has en external USB enclosure with a 120 GB SSD drive in it, used as the boot medium. While USB boot of ESXi is being deprecated, this is at least a more durable option than booting from an SD-Card that is prone to dying.
Dell OptiPlex 7090 UFF Host Details#
| Component | Description |
|---|---|
| Model | OptiPlex 7090 UFF |
| CPU | 11th Gen Intel(R) Core(TM) i7-1185G7 @ 3.00GHz |
| RAM | 64 GB |
| Storage | 1 x 500 GB M.2 NVMe + 1 x 2 TB M.2 NVMe |
| NIC 0 | On-board Intel Corporation Ethernet Connection (13) I219-LM 1GbE |
| NIC 1 | External Startech USB 3.0 2.5GBase-T |
| Boot device | Kingston A400 SSD 120GB in an ICY BOX IB-235-U3 enclosure |
For now, the physical setup is a bit messy and leaves a lot to be desired in the cable management department, but at least they are operational. Note the ingenious use of velcro to attach the boot devices!
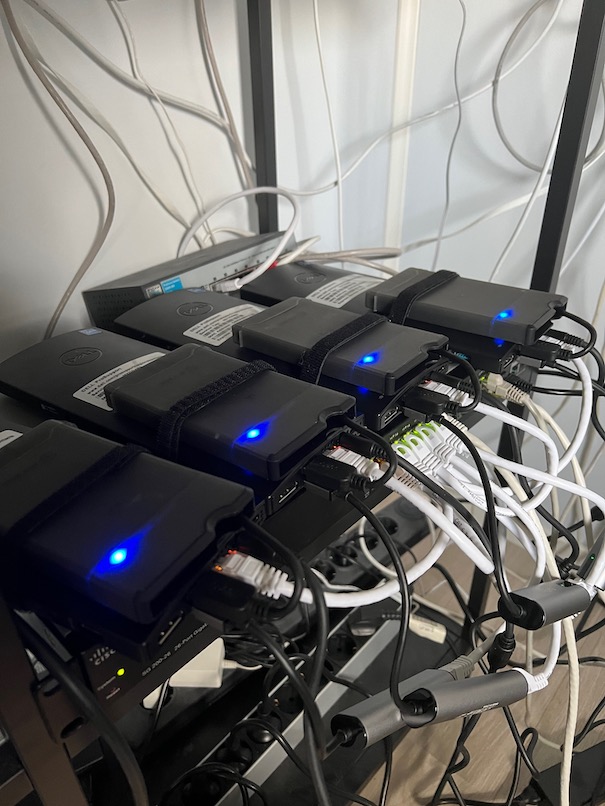
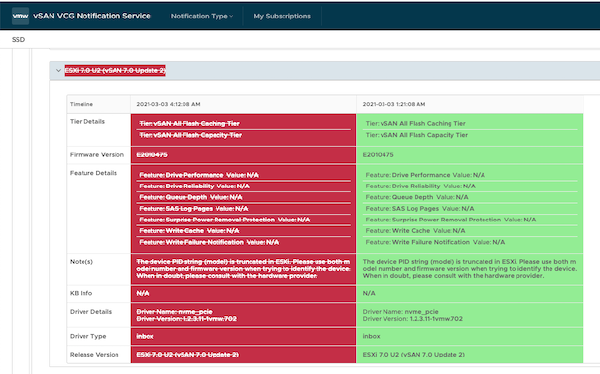
Since each host has two M.2 NVMe devices, I can also use these for a vSAN setup as well, which I’ll cover in a later post. I am still waiting for the delivery of some additional Startech USB 3.0 2.5GBase-T NIC’s before I set that up, as I want to separate out the vSAN and vMotion traffic on the external USB NICs — And I promise to clean up the cables once everything is in place.
Another limiting factor right now, is that the entire setup runs on a Cisco SG200-26 1 GbE switch, so I’m limited to 1 GbE for the time being. 1 GbE networks for vSAN is unsupported for all-flash setups, but as it’s an unsupported home lab environment it will have to do for now. At least until I get my hands on a 2.5 GbE switch that I can use for vMotion and vSAN traffic. Of course, 2.5 GbE is also unsupported (the only supported option for all-flash vSAN is 10 GbE or higher), but 2.5 GbE would be better than 1 GbE at least, but I’ll wait and see how the vSAN performs on this rig before I do anything.
So there it is, my new 4 node ESXi cluster, based on the weird form factor Dell OptiPlex 7090 UFF’s!
I’m also building a BOM with more details here..